Back
Basic Scripting
Last updated Saturday, August 23, 2008
Not sure how many words
I finally broke down and wrote up a tutorial. If you have any questions, please ask in the chat box or via e-mail, or you can ask on the map-craft forums.
This is just a quick-and-dirty intro to scripting. Now, you may have heard a lot about what scripting can do with Jedi Academy, but you need to know how to properly use BehavED before you'll get very far.
So, first things first, let's make sure you have the Jedi Academy SDK. You'll need it.
Once you have that installed, find where you installed it to and open BehavED. (I think the default directory is gameData/radiant-1.4/tools)
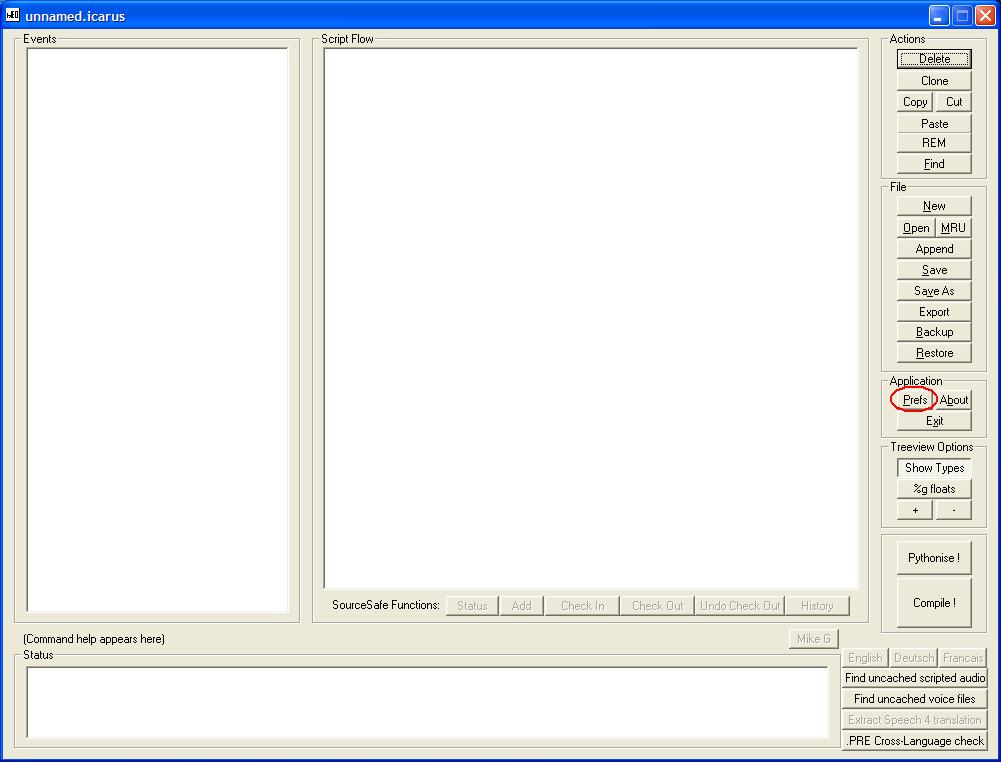
If your BehavED window looks like the picture below, you need to set up your paths. Click on the Prefs button and set the paths to IBIZE.exe, the Command Description File (Behaved.bhc) and the SourceForBehavED folder. It's not a hard thing to do - just find where you have BehavED installed and take a look. If you don't see it, then download and reinstall the SDK (link above).
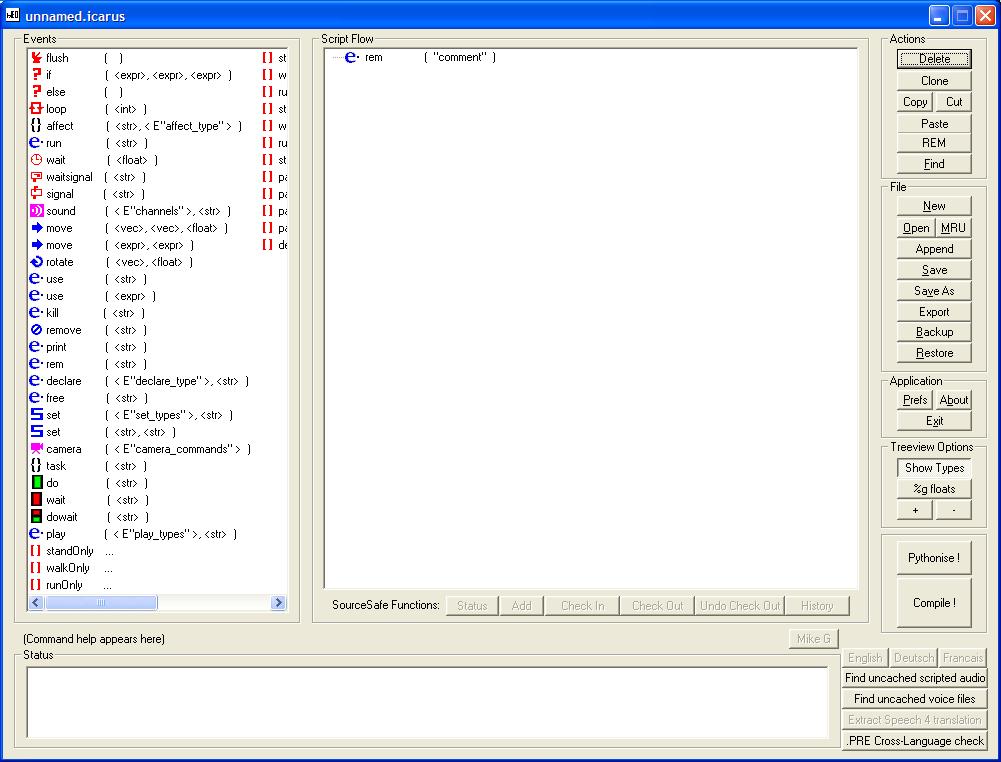
Once everything is set up properly, BehavED should look like this:
Now we can get started.
How to initiate scripts
The first thing you need to know about scripting is how to run scripts on your map. There are many different ways you can do this. All of them are by key/value pairs on entities. Using these, there are several ways to run scripts, but here are the three best ways:
• useScript key
• spawnScript key
• painScript key (NPC only)
As a sidenote, you may be wondering about target_scriptrunner. I can assure you, this entity has it's uses, but it is only necessary in advanced scripting. For this basic tutorial, I'll show you the most efficient way to run a script. Avoid target_scriptrunner like the plague for now.
Now, you're probably thinking, "What on earth do those key/value pairs mean?" Well, I'll show you how to input them and you should be able to understand it. The picture below demonstrates how you would set up a script to run on an entity.
NOTE: You would normally only use ONE of these, not all three at the same time. It depends on how you want it to function.
Typically, you would run one script per entity.
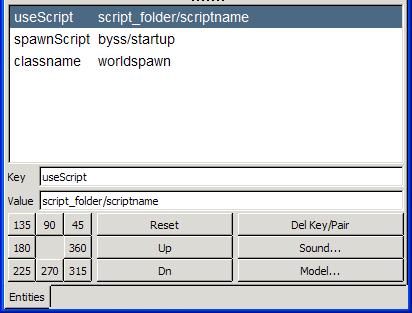
A useScript will run the set script every time the entity is "used", either by a player, an NPC, an entity or another script. Do NOT put a useScript on the worldspawn...I did it for the picture to show how to enter data, so please ignore the worldspawn.
A spawnScript will run every time the entity spawns. This goes two ways:
• If the spawnScript is applied to an NPC, it will run the script on the NPC every time it spawns.
• If the SpawnScript is applied to any other entity, it will run when the map loads (that's when they 'spawn' into the map). This includes putting them on the worldspawn.
Okay, so now that we have our terms cleared up, let's get into basic BehavED work.
How to use BehavED
So, you're looking at this program and thinking...... "What's this do? What's that do? What's it do? What's it DOOOOO?" I'll clear it up for you.
BehavED is a drag-and-drop interface, meaning you will drag things around to create and modify your scripts. You will type in certain values in preset areas, but mostly, it's just mouse work. It's very easy to learn.
Let's have another look at BehavED:

The tall, thin window on the left side of the screen with all the strange icons and words (Flush, If, Else, Loop) is called the Events window. This is where you will drag script commands from. The commands are known as blocks.
The big window in the middle is the Script Flow window. This is where your script code actually exists. You will drag commands here to make the script do what you want.
The Status window shows what BehavED is doing. It will display copy and paste information, compile error codes, save status and any program errors.
Let's kick off using BehavED with a big warning:
DO NOT push shift+enter while making a script! BehavED will crash!
Since I use a laptop, it's very easy for me to accidentally slip off the enter key and hit shift at the same time. SAVE OFTEN. It's not worth losing your work.
That being said, let's create a first script. Let's make this short and sweet. Let's say we want a usable button in the map. When triggered, it will wait 5 seconds and display a message, then open a door.
In this simple scenario, there are 2 entities involved - a trigger and a door. You won't need a target_print or a target_delay, thanks to the script you're going to make.
First off, take any old map in Radiant, and create two new entities. The first one should be a trigger_multiple, and you need to check the "use_button" box and give it three key/value pairs: "wait" "2" and "targetname" "scripted_door".
For the door, just make any old func_door, but give it two key/value pairs. You'll need: "angle" "-1", "targetname" "scripted_door" and "useScript" "myscripts/door_script" .
Now, it's time to make your script. If you're making a sample map, then go ahead and compile it while you're working.
Open BehavED, and start a new script. Save it in a scripts/myscripts folder, and use the name "door_script" (quotes included).
Now that we've saved it, let's modify the comment line to reflect what the script will do. Double-click on the comment line. You will see a dialog box appear with a text box. Type anything you want that you think describes the script.
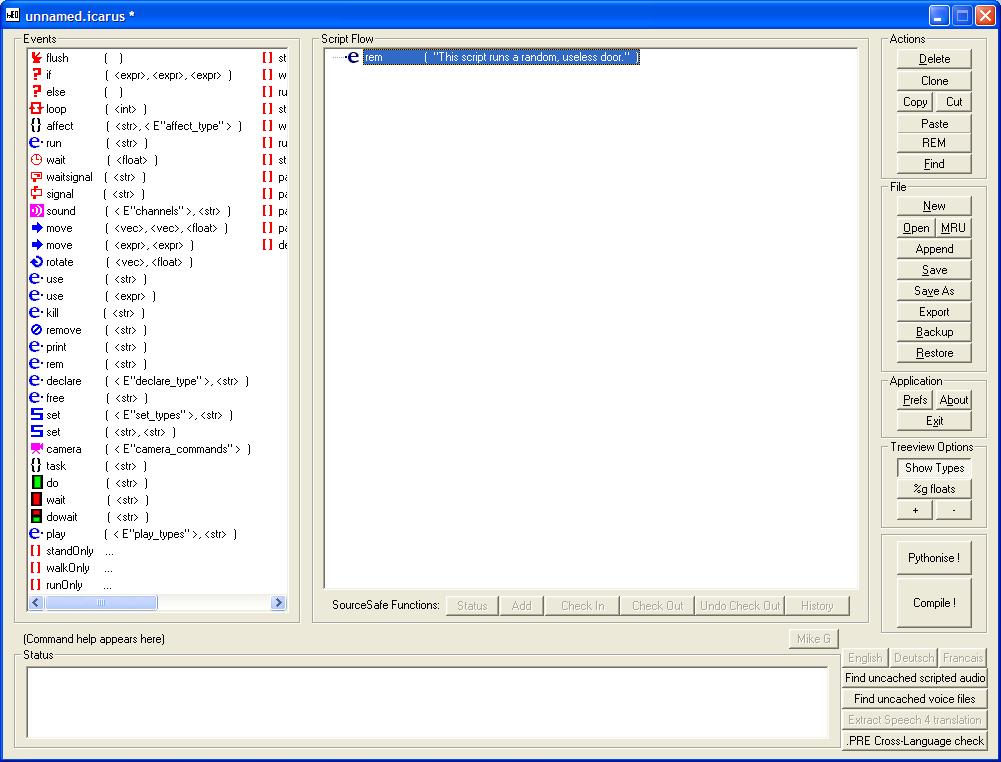
Now you need to make the script do something. The first thing it needs to do is print a message, so grab the print block from the left side and drag it into the script flow window:
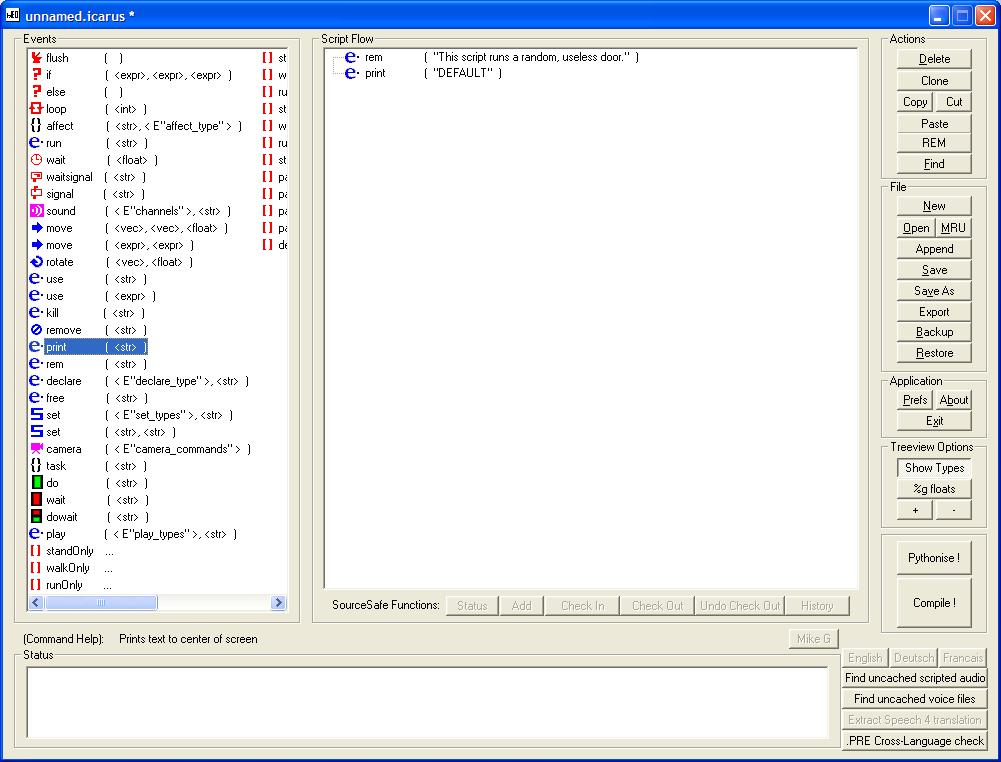
Now, double click on your new print block and type a message. However, there is something very important to note here:
To make a print block operate like a target_print, you MUST begin the message with an exclamation point!
The exclamation point will not show in the message, but it is needed, or else the print will only show in the console when you are debugging. We'll get into that with advanced scripting.
Special thanks to Lassev for the tip on that. :D
This is what I typed for my message:

Now, you need to tell the script to wait for five seconds. This is the interesting thing about scripts; they will run every block they come to until they are told to stop. So if you have 2,000 blocks in one script, they will all run at once. None of them will wait for each other. However, if you put a wait block in the middle of the script, it will run one half of the blocks, wait for a specified time, and then run the rest.
The problem is that there are two wait blocks. You want the one with the clock symbol (it's the 7th block from the top).
Waits are measured in milliseconds, so you'll need to type a 5000 for the proper wait time, then click ok.
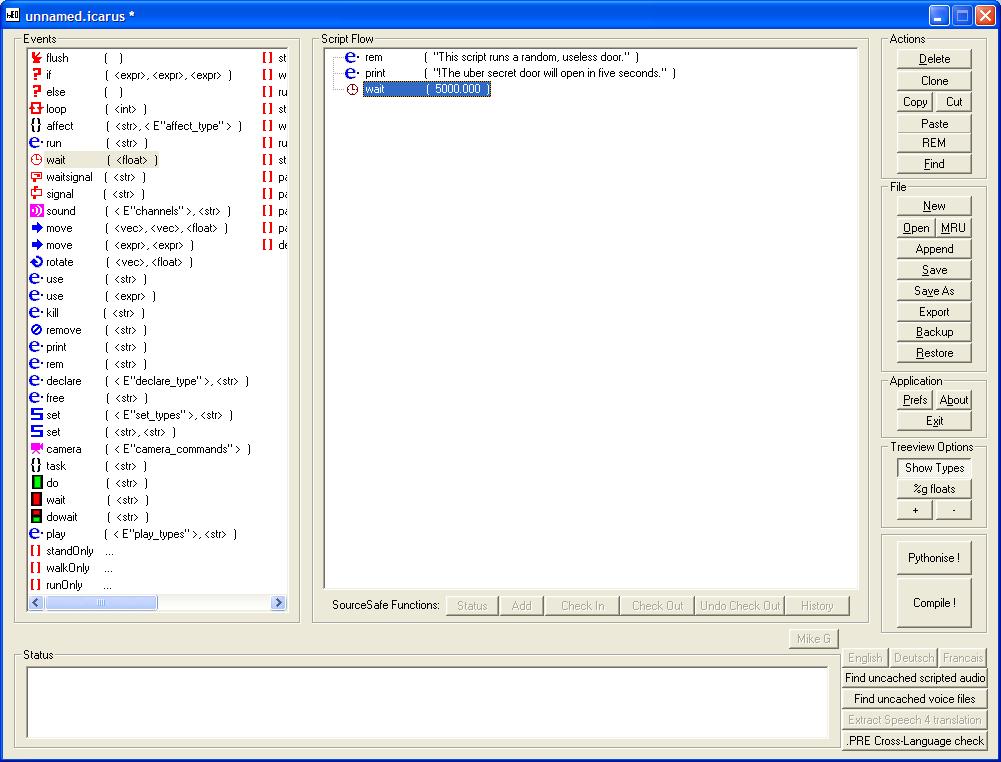
Lastly, you'll need a use block. Drag it over.
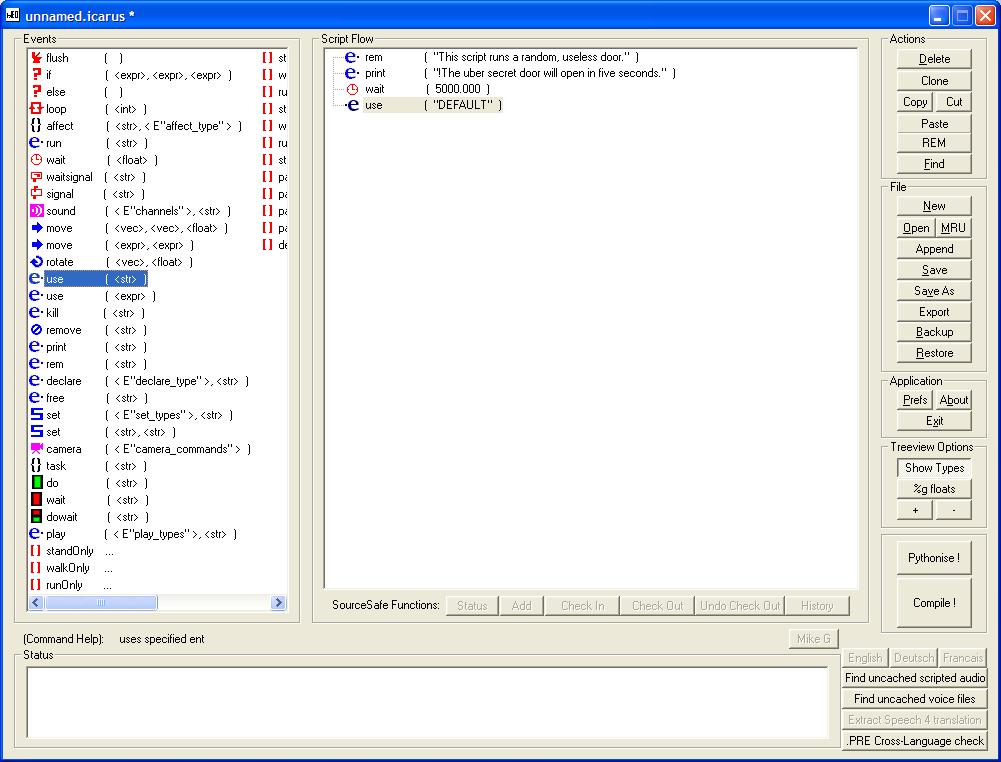
Now, type in the targetname of the door. We gave it the targetname "scripted_door" above. Your script is done! Click the "Compile!" button in the bottom right corner of the BehavED window. You should see a smiley appear in the status window. Here's how your final script should look:
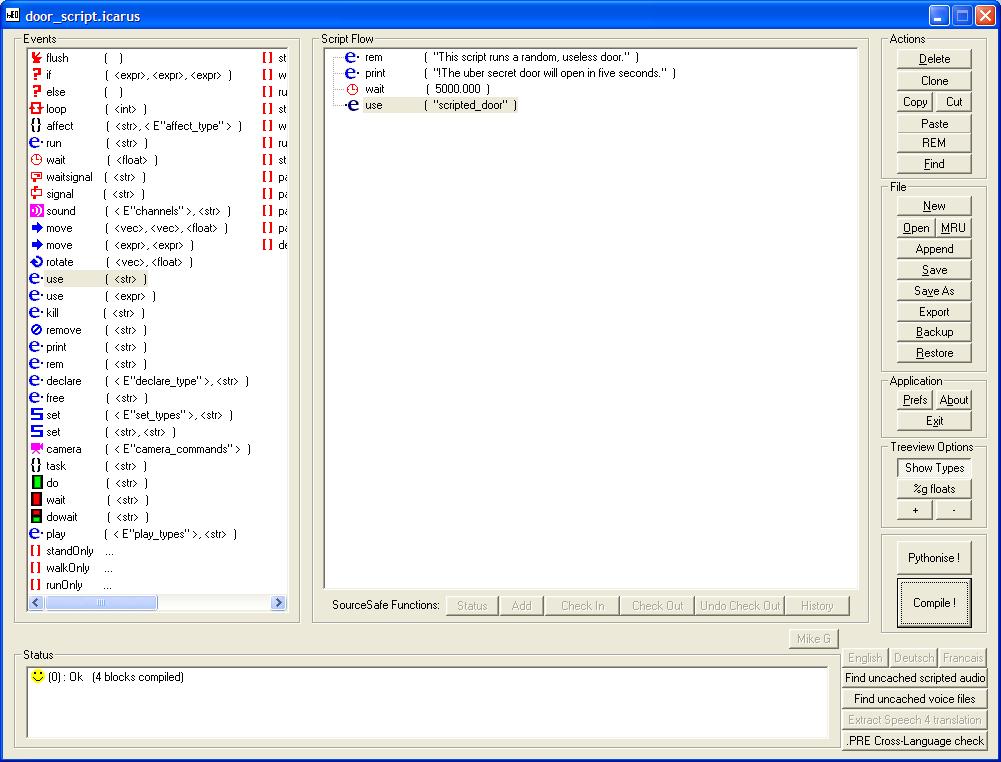
If you were following along with a map and compiled it, devmap it and check out your new door!
So, this is pretty basic, huh? This script is pretty useless, because all it does is save a few entities. However, this is only scratching the surface. Below is another example, but this one will do something that entities cannot do.
Code Doors
If you've looked over the list of script blocks available in BehavED, you've probably noticed the IF block. This block is going to become your best friend once you see how to use it. Let's start with something simple: a door with a code on it. (Yes, this is simple, at least in comparison of the other things you can do with scripts.)
This part of the tutorial is made because of a request for scripting help from Guardian. Because of this, the tutorial is set up the way Guardian's map used it, so it may seem new to people who haven't played JK2. It's a good idea, though, and a nice way to keep people out of unwanted areas.
Here's the basic setup.
There are four computer consoles and a door involved. Three of the consoles have symbols on their screens, and the fourth is just a button. The door, obviously, opens when you have the right code.
You may have already guessed. By using the three consoles with the symbols on them, the player will make a combination of symbols. When they think this "code" is correct, they push the fourth button. If they had the correct symbol code, the door opens. If not, nothing happens.
To start, three func_usables and four trigger_multiples are used in this setup. The three func_usables are used for the computer screens with the symbols, and there is one trigger_multiple for each button.
Why the func_usables? Simple: using an animMap shader, you can make them change texture whenever they're used. So by doing this, you can make the screens cycle their displayed images.
So, let's get started! The first thing we'll do is make the three symbol buttons operate.
Select the first button's trigger_multiple, then press N to bring up the entity window.
You need to type in all the following key/value pairs (well, the spawnflags option is the same as hitting the "player_use" checkbox).
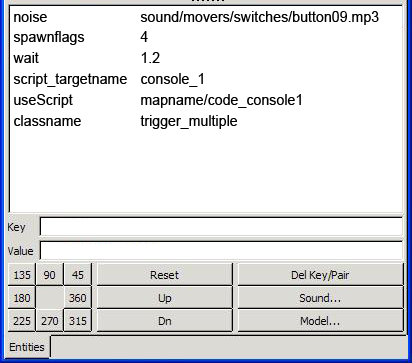
I'll explain the reason for these from the bottom up.
• Classname Trigger_multiple
This is a no-brainer. You should already see this in the entity window, so don't bother even thinking about possibly typing it in.
• useScript mapname/code_console1
This is what will fire off the script. Every time the trigger is used, the game will execute the script "scripts/mapname/code_console1.ibi"
Note that for this setup, all three buttons can use the same script.
• script_targetname console_1
This line will allow the script to perform operations on this entity. This is important later.
• wait 1.2
Any wait value will do fine here, I just use a mediocre value. As a tip, abstract values are always better with waits and things, but ALWAYS leave enough time to perform operations and have a little leeway. 1.2 seconds is way more than enough for this script, so giving enough time for lag and other factors, 1.2 seconds is a decent value. Increase or decrease it at will.
• spawnflags 4
This is the same as hitting the "use_button" checkbox and unchecking all the others.
• noise sound/movers/switches/button09.mp3
This isn't really necessary, but it adds a beeping noise to the button. IT IS VERY USEFUL FOR DEBUGGING IN-GAME, so I'd highly recommend using something on it, even if you only use it for tests.
IMPORTANT!
Don't miss this next part if you're just skimming over!
You'll need to do the same for the other two buttons, but make sure you use different script_targetname values. This can generate very confusing results. As a newbie scripter, such errors can confuse you to no end. You'll see why towards the end.
Oh, and also, I hope you're changing the "mapname" folder in the useScript's filepath to the name of your map, and making a corresponding folder. It makes things easier when you're having difficulty.
Next, we need to set up the fourth button in a similar way, just with a different script. Since this one will be used to check the code that has been entered, it will need to be a little different. Obviously, you'll need a different script on it. But I would also suggest using a different button sound and a longer wait time as well. The extra wait will make the button less abusable, and the different button sound will make it easier to understand that it has a different function.
For the wait time, give it something like 4 or 5 seconds, and for the script, use the following value:
• useScript mapname/code_check
You'll also need to change the script_targetname to something else, like
this:
Two more things remain. You need to give the func_door a targetname, so that you can fire it from the script. You also need to give the func_buttons a targetname for the same reason, so that the textures on their faces change.
• Give the func_door a targetname, like "code_puzzle_door" Also, check the "toggle" checkbox.
• Give the func_buttons each a unique targetname, like "button1" "button2" and "button3". Just make sure the rest of your map doesn't use those targetnames, because the script will be using them a lot.
Okay! You're ready to start scripting. If you're following along, go ahead and compile your map. It'll save some time.
Making the script
Let's start with the puzzle checking script. Yes, there's a good reason to do this.
Save your file as "code_check.icarus" in the "mapname" folder.
We'll be using something called a SET_PARM to do the dirty work here. A SET_PARM is just a variable stored on an entity. These are used for entity-specific work, where you want one entity do do actions on it's own regardless or what the rest of the map is doing. I'll go into detail on them in the advanced tutorial. For now, all you need to know is that there are 16 SET_PARMS on every entity in the game, including the worldspawn and players. They are named 1 through 16, so you have SET_PARM1, SET_PARM2, SET_PARM3, and so on. Pretty straightforward so far.
Since scripts need to know what data is what, there are preset types of variables you can use. This goes for all data, including SET_PARMS and global variables. The types of variables are strings, floats and vectors.
Now for the concepts. Read carefully, and if you miss anything, reread it. This is crucial.
Here's how the code checking script will work:
Each button will store it's number in SET_PARM1. So this script will need to check every button's SET_PARM1 and, if the value is correct, it will open the door by using it. After a set number of seconds, the script will close the door again.
Here's how the button script will work:
Every time a button is used, it needs to 'use' the func_button associated with it. This way, the screen on the button will change to the next image. In addition, it will have to set SET_PARM1 to match the value on the screen, so that the checking script can know what is on the screen.
A tad confusing, probably. You can figure it out while you work on the scripts. Let's get them started.
The Code Checking Script
This one is the most important script, so we'll have to be careful what we do with it.
Open BehavED.

We already specified what names we want the scripts to have up above:
• mapname/code_console1
• mapname/code_console2
• mapname/code_console3
• mapname/code_check
It's always a good idea to save before starting a script, that way you can concentrate fully on the script without having to worry about BehavED crashing. Just be sure to save once in a while. Save this script as mapname/code_check.
Let's start by giving an appropriate comment in that REM block up there.
This script needs to get the state of each button, and if it's correct, it will open the door. So, to start, let's have it get the status of each button.
Locate the affect block and drag it into your
script.
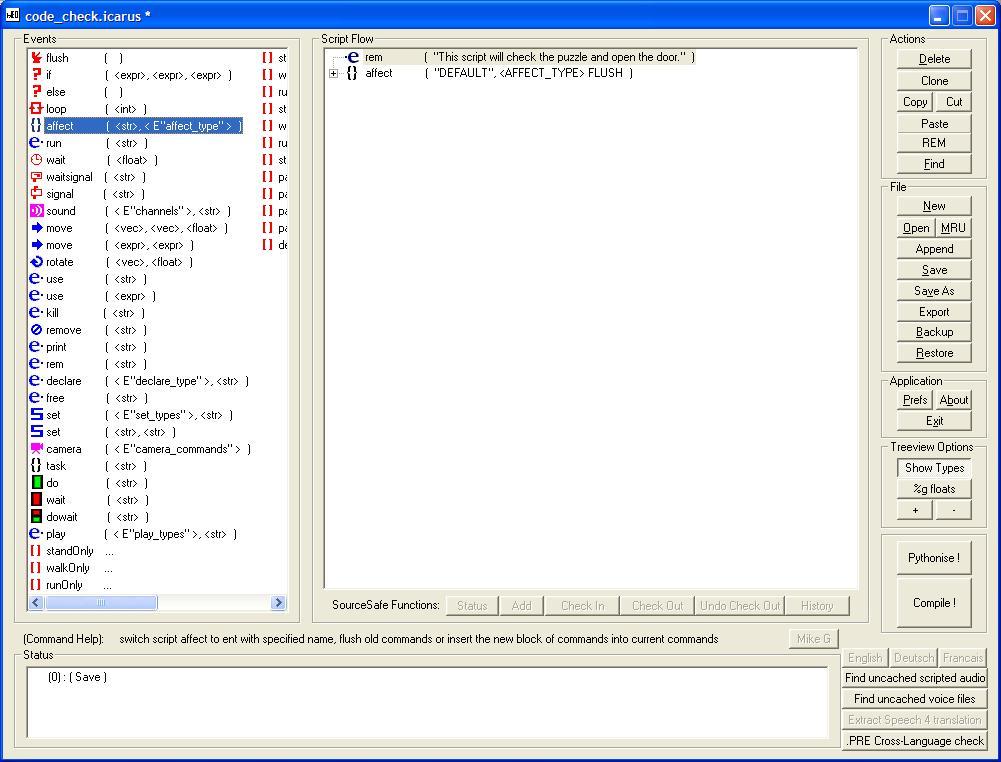
This block is one of the more powerful functions in ICARUS, but it does have some drawbacks. Since scripts run on entities, this block will shift that focus to another entity. If you were getting PARMS from one entity and wanted to get one from a different entity, an affect block would do the job.
On the flip side, it may be difficult to do that because you can't transfer PARMS back and forth from entities. This is one of the weaknesses of ICARUS. The only method I know of is to use a global variable, which we'll do in a minute.
Double-click the affect block. It will expand the tree. Double-click it again and you can type in it. We want to get the PARMS on buttons 1, 2 and 3, so we'll start with button 1. Remember those script_targetname values we gave them? This is where they are used - for affect blocks. The first button was called console_1, so we'll type that in. We'll also change the affect type to insert to avoid possible script
conflicts.

As I said above, we can't just transfer PARMS between entities, so we need to make a global variable we can use. Locate and drag the declare block into the script between the affect block and the
REM line.
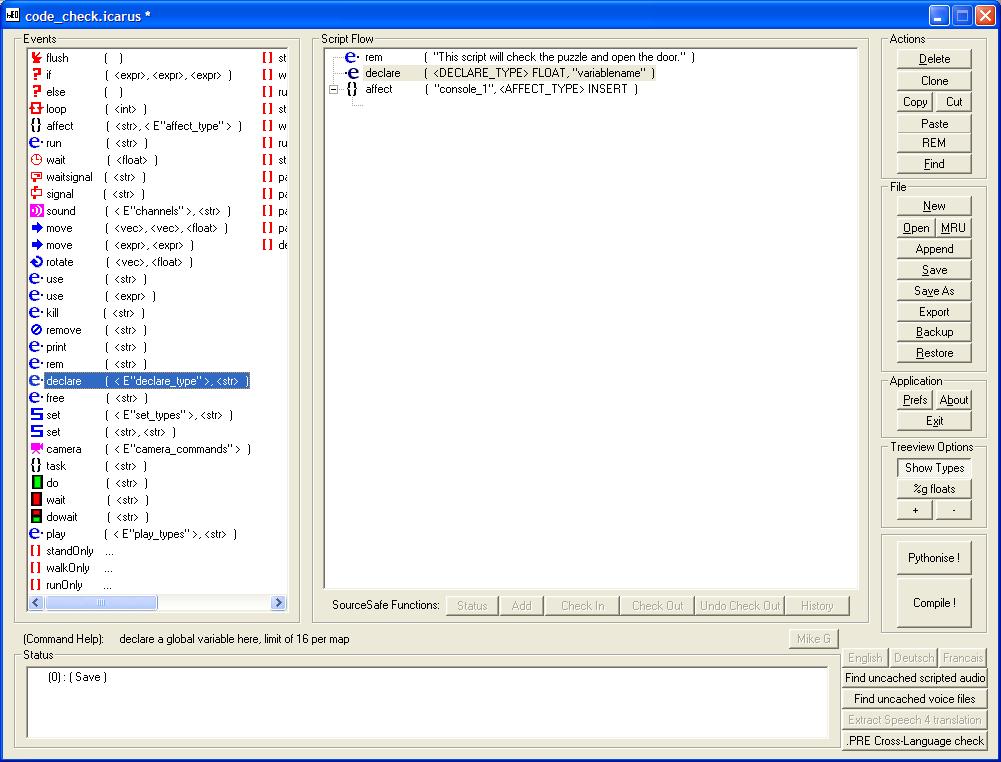
Every map can have 32 global variables in use at any time. As with all script data, it uses the same three data types - strings, floats and vectors. We'll need this to be a float, because it's just going to be incremented when one of the consoles is correct. For a name, let's give it something that describes what it does. I think code_door_var sounds fine, but you can use
whatever you want.

It's always a good idea to initialize your variables after adding them. I think ICARUS does this automatically, but if that variable is in use somewhere else or you forgot to free it (more on that later), it will have an unexpected value and can mess things up. So let's start it at 0.
Find the SET ( <str>, <str> ) block and place it under the
declare block.
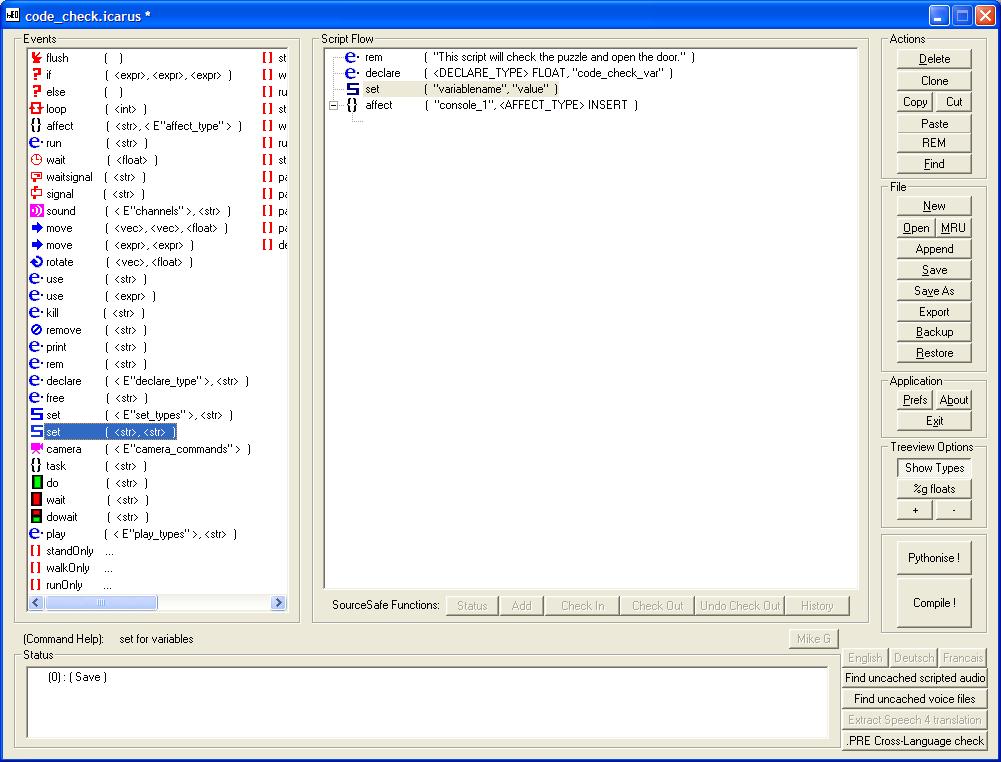
Double click this block and enter the
necessary information:

Now we will need to have the script determine whether or not to increment our global variable. Grab an IF block and put it inside the
affect block.
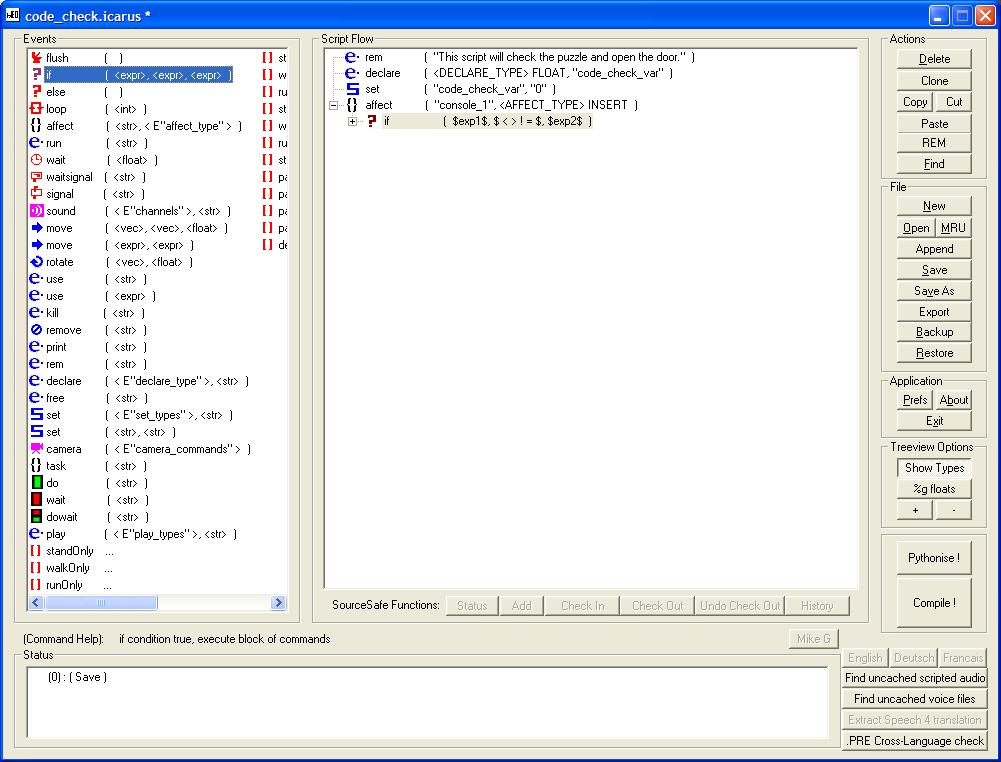
This block is probably the most powerful block in ICARUS. Double-click it once to expand it's tree, and again to set it up.
This window might scare you a bit. Rather than explain everything, I'll just show you what to do. I'm sure you can figure it out, just don't be
intimidated:
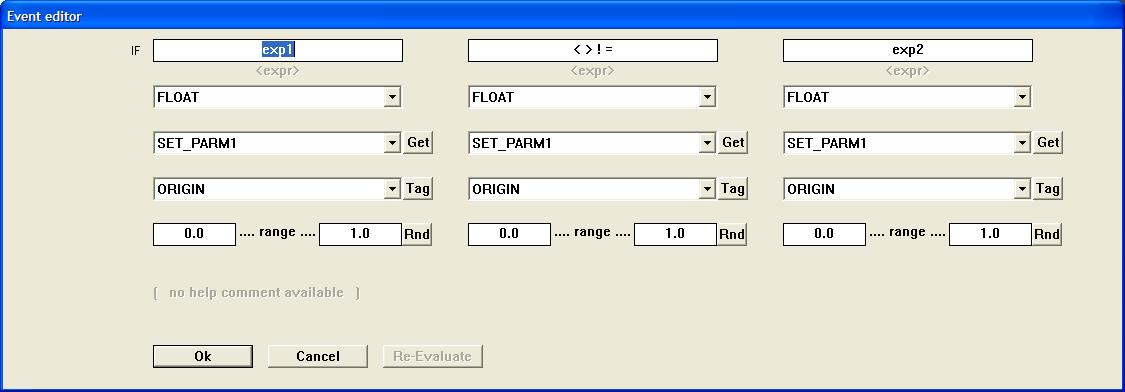
That's a lot of info. To simplify, only the top three text boxes affect how the script runs. The ones below them are there to help you enter info.
Setting up the first block is easy. Just click the button
circled in red:
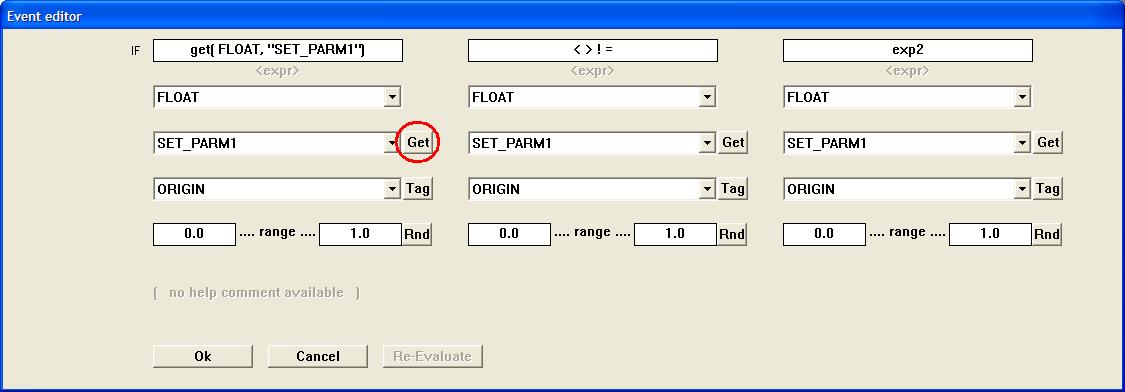
Next, you need to make the middle block an
equals sign:
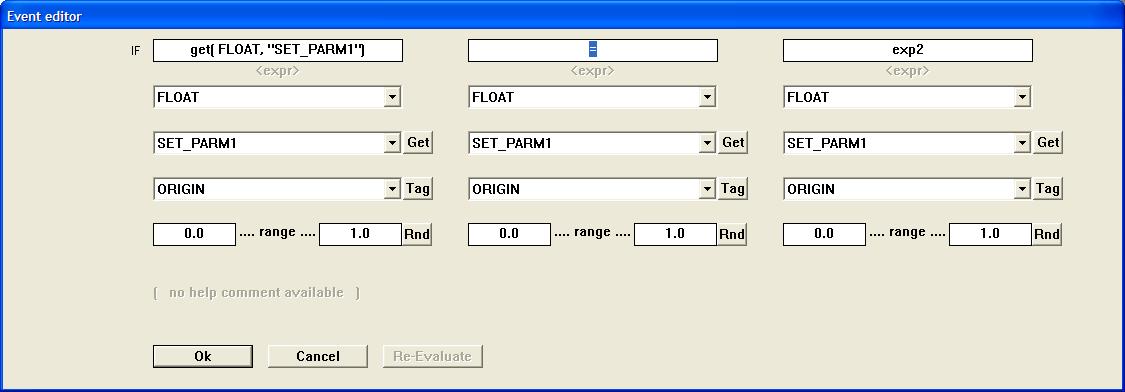
Now we get to the last one. THIS IS WHERE THE CORRECT NUMBER FOR THIS CONSOLE WILL GO. This will be tricky, because you need to know what frame in the AnimMap shader you're using will be the correct one for button 1. This will be the number you put here. I'll just put a 1
for now.
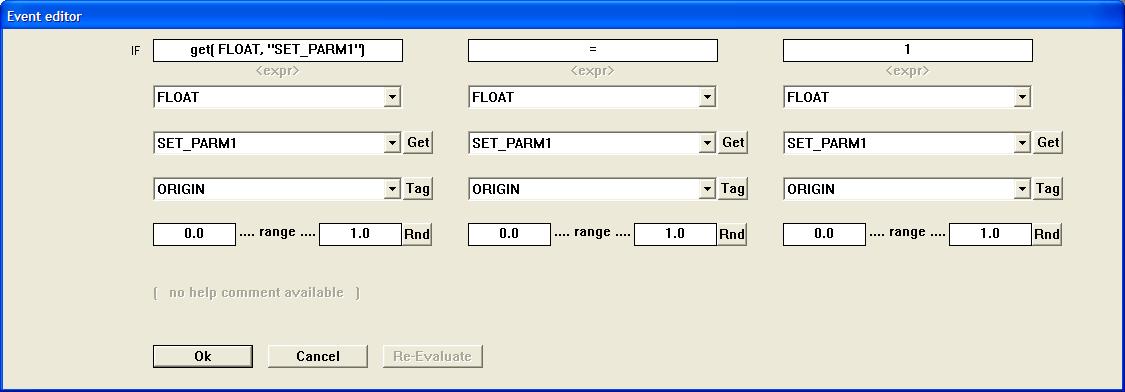
Click OK, and you should see
this:
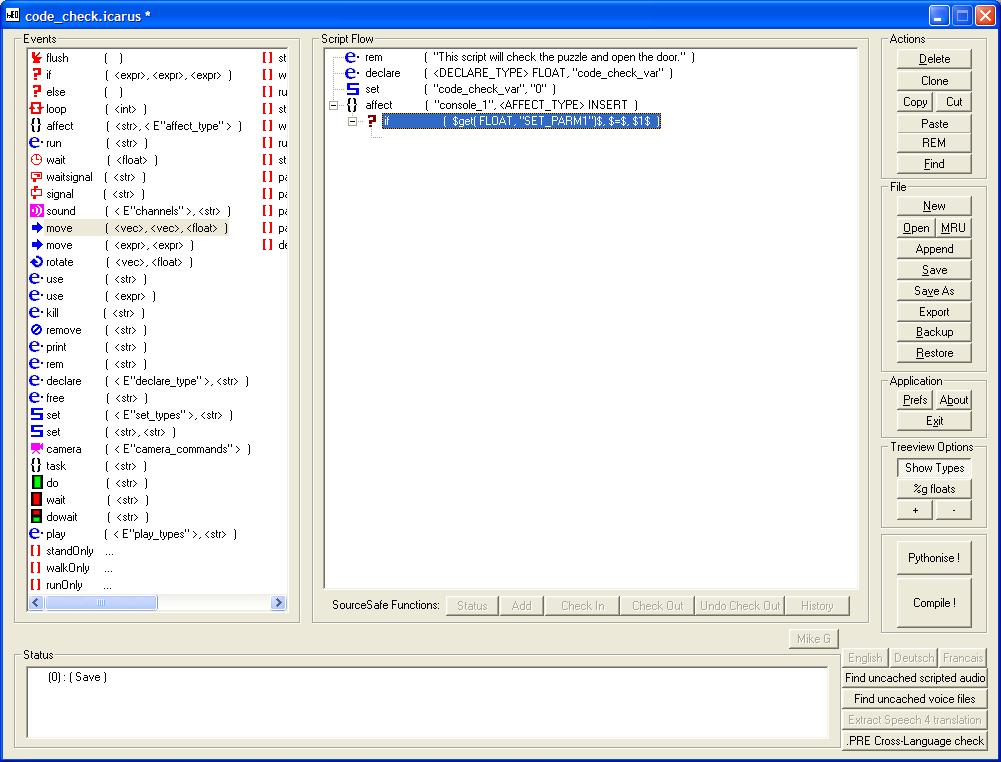
I would suggest saving your script now.
You don't want to risk losing anything - save often.
So, basically, the IF you just created makes the script ask itself a question:
Is the value in SET_PARM1 (on this entity) equal to a "1"?
If it is, then the script will execute the blocks inside the IF statement. If not, it will be ignored. You can also use ELSE statements for even more functionality, but I would consider that advanced scripting.
Now, we need to put something inside the IF statement. All we need for this one is a simple SET block that will add a 1 to our global variable. This is done via a hidden feature in ICARUS. Thanks to Lassev again for this invaluable tip.
Locate the SET ( <str>, <str> ) block and put it inside the
IF block.
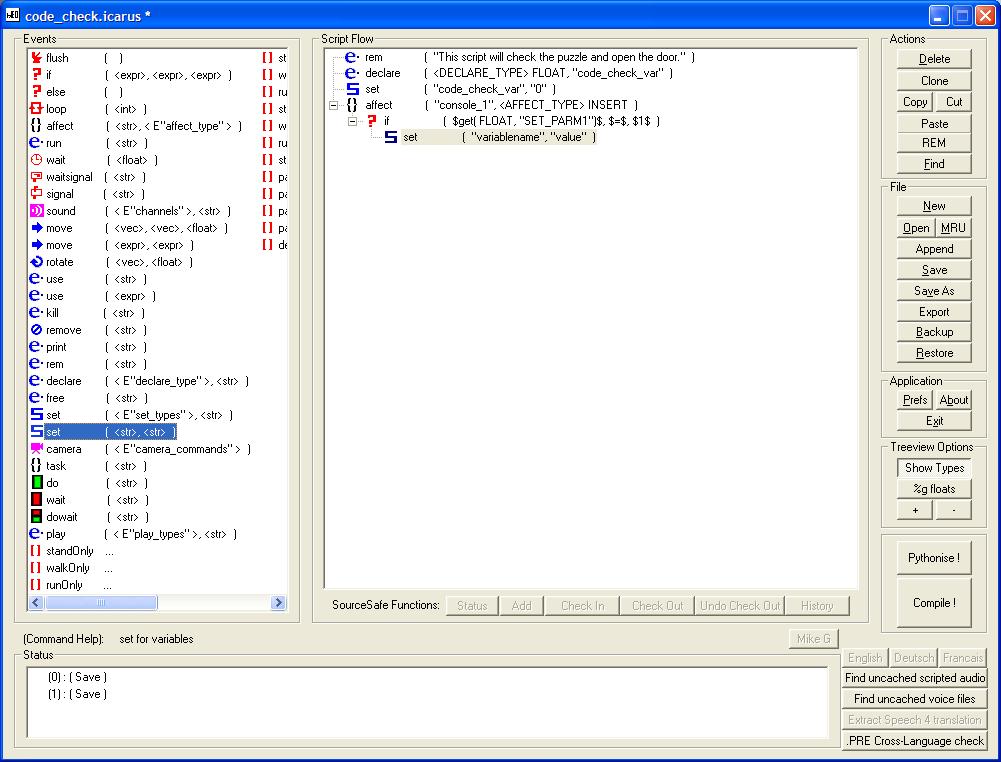
Double-click on your new SET block and input the
following info:

You may wonder why it says to set the variable to "+1". Surely that's a typo, right? Not at all! This is the hidden feature I mentioned above - adding. This will take whatever value is in the specified variable (in our case it's code_check_var), and add the number after the + sign to it. You can also do this with a minus sign for subtraction. For now, though, we'll just add a 1 and leave it at that.
Next, we need to copy this same thing for the other two buttons. Collapse the affect block and
copy it.
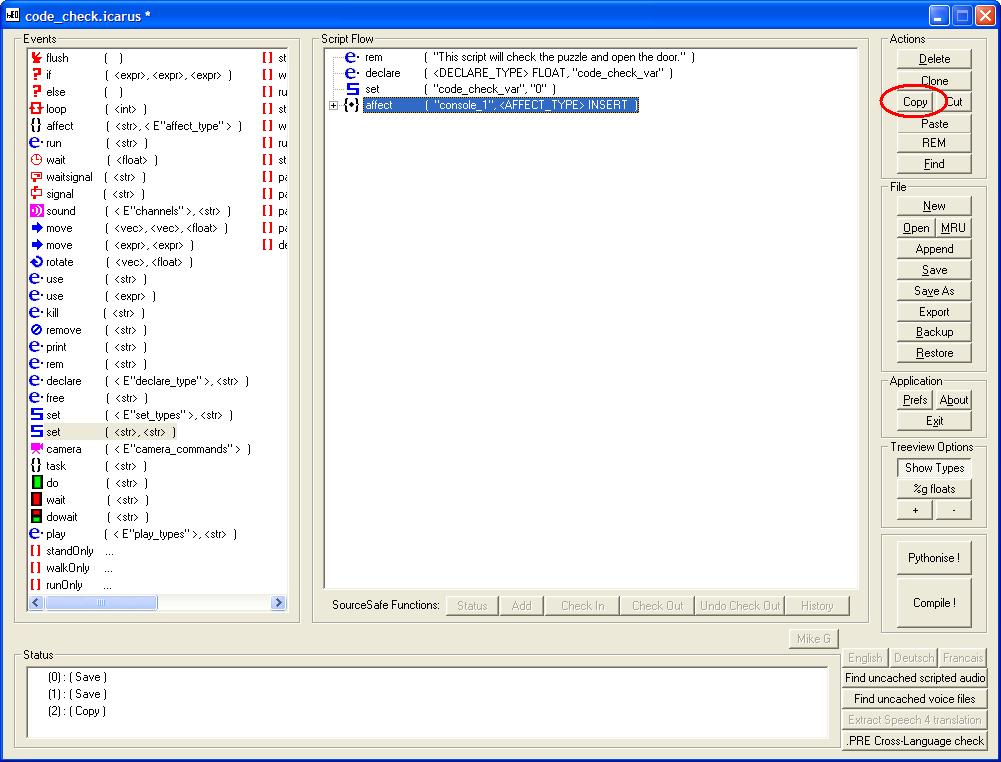
Now,
paste it twice.
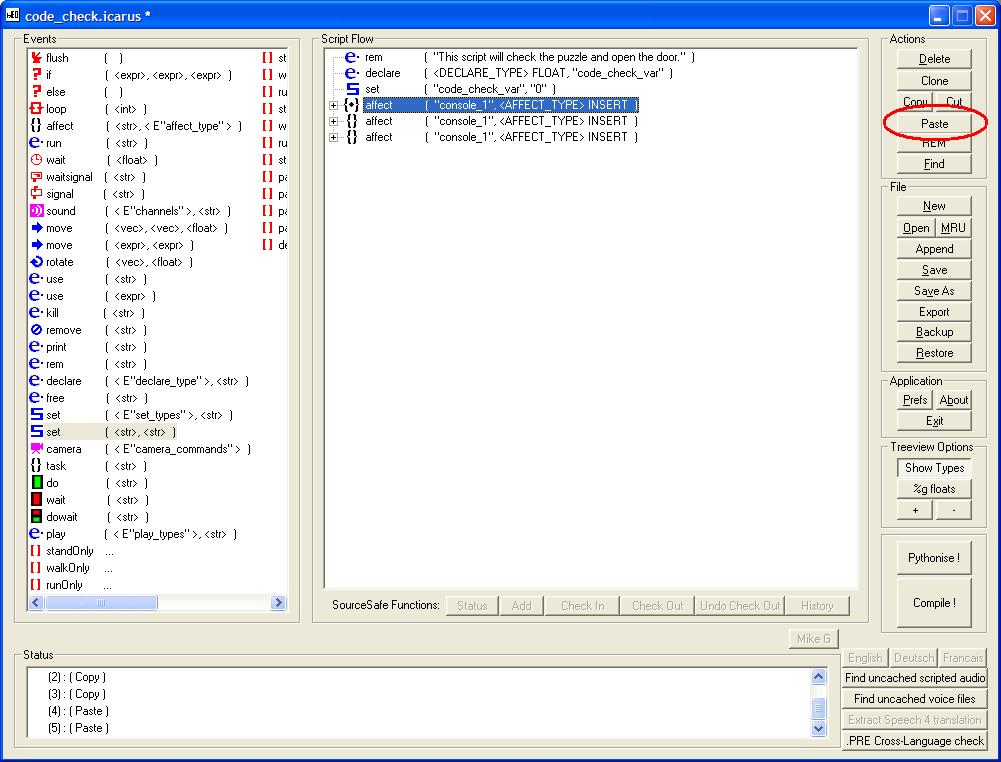
Next, you'll need to change the AFFECT blocks to reflect the proper consoles, So
let's do that.
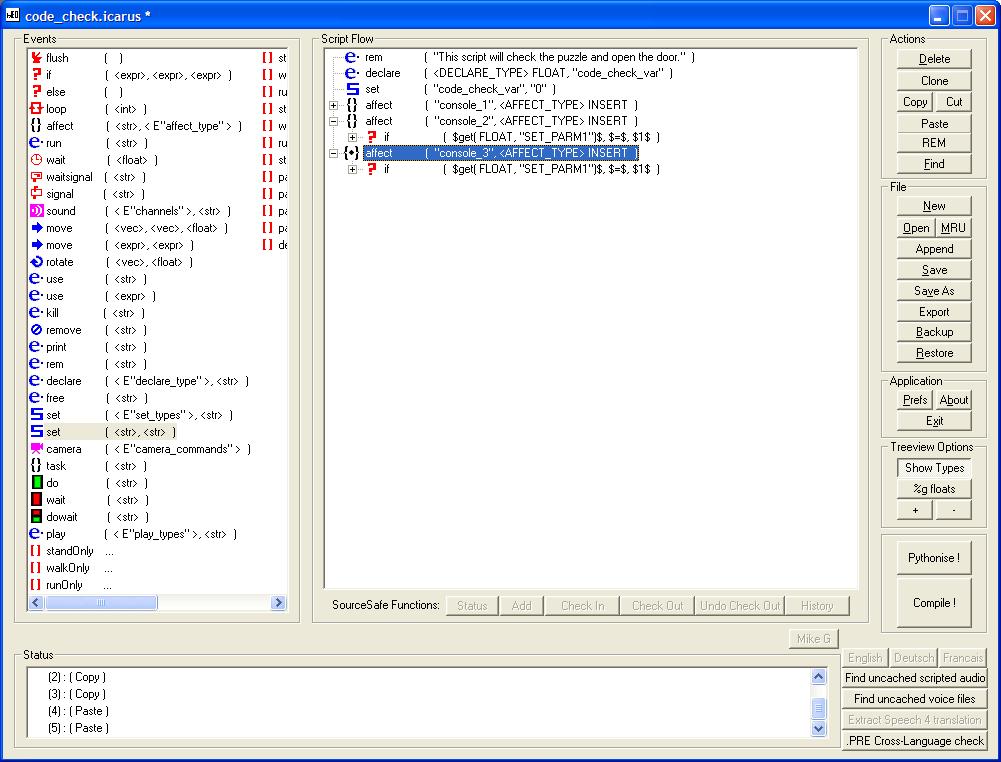
The other thing you need to do with your copies is to change the answers.
For this script, I'll leave them with a 1, but you will need to change them for the buttons to work properly. Again, they will match the corresponding animMap frame.
Now, close all the affect blocks. (You MUST do this, or else your next block will be out of order). Add a WAIT
block.
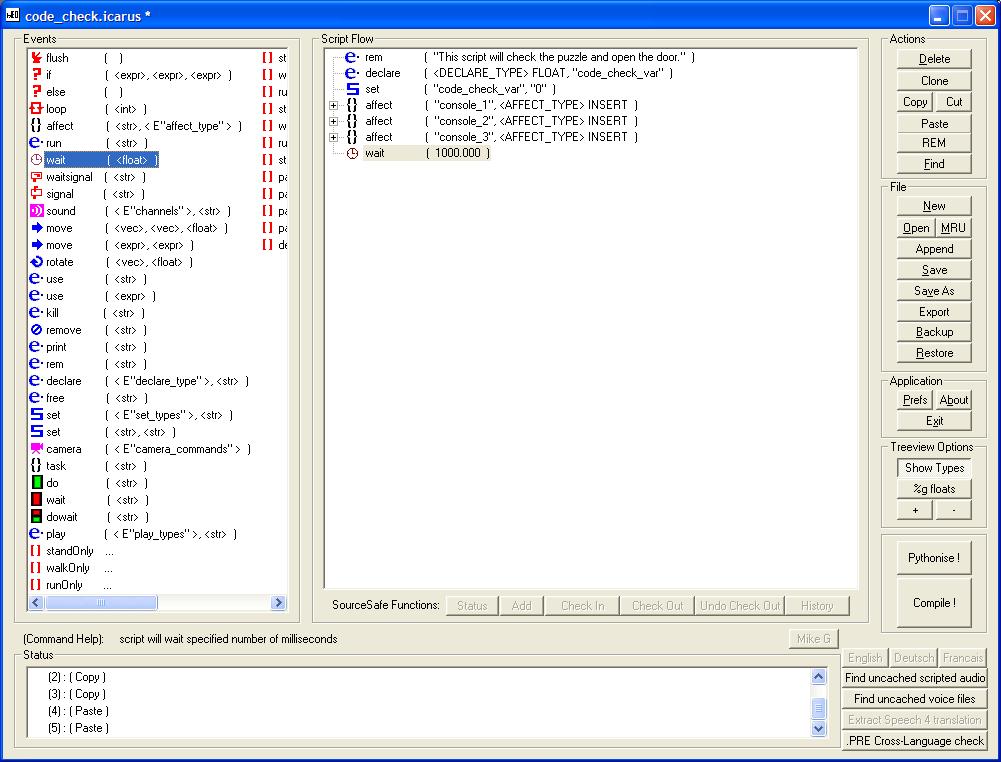
Give this wait block a value somewhere around 100. Don't worry about the reason why this is added - that's an advanced concept. For now, understand that it's necessary.
I would suggest saving your script again.
Finally, you need to check the value in code_check_var, to see if it's high enough.
Add a new IF statement under the WAIT block. Double-click on it twice to open it up.
We're going to use a little trick to save some typing. Click the GET button next to the SET_PARM1 in the first column, then replace the SET_PARM1 text with code_check_var.
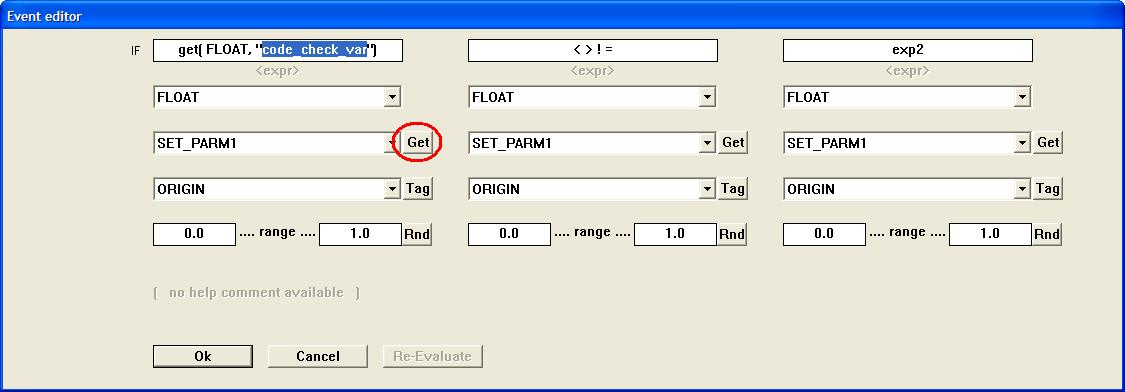
In the second column, put an = sign, and in the third, put a 3. It should
look like this when you're finished:
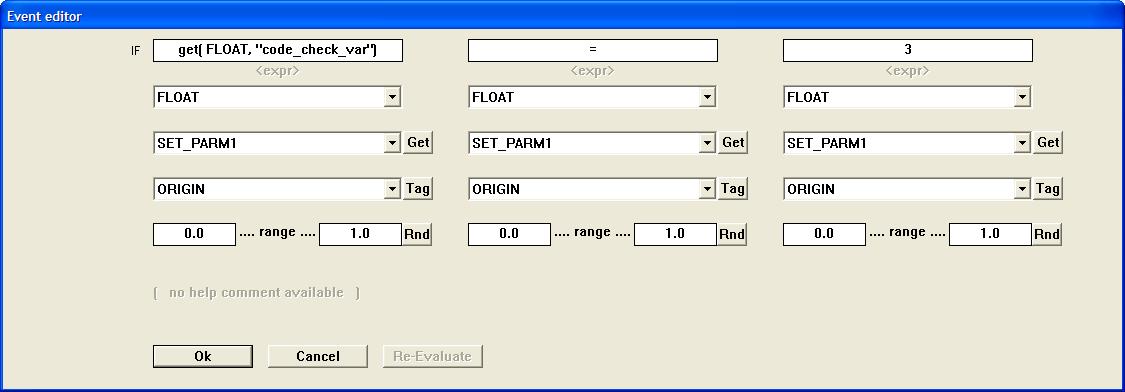
Click OK. We now have a few final blocks to add for this script to be functional. First, add a USE block
inside the IF.
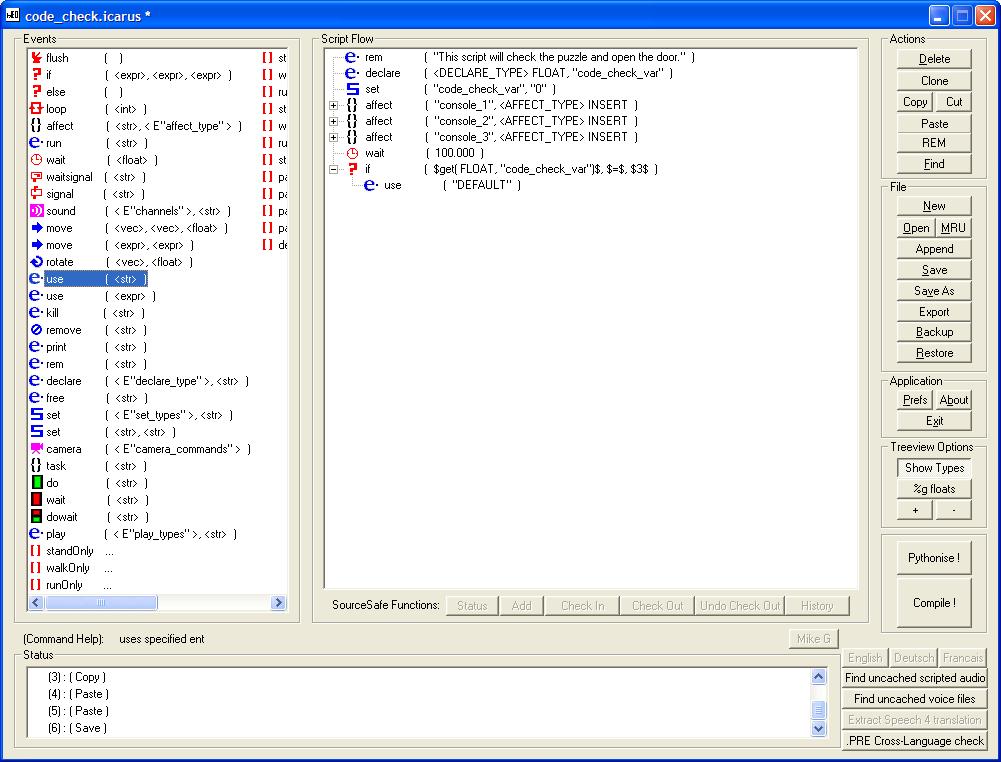
Double-click your new use block and type in "code_puzzle_door". (That's the name we gave the door up top, remember?)
Next, add another wait block. This one will define how long your doors will stay open, so choose a value accordingly. Remember that the value is in milliseconds!
Finally, copy and paste the USE block so that you have another one under the wait block. The final script should look like
this:
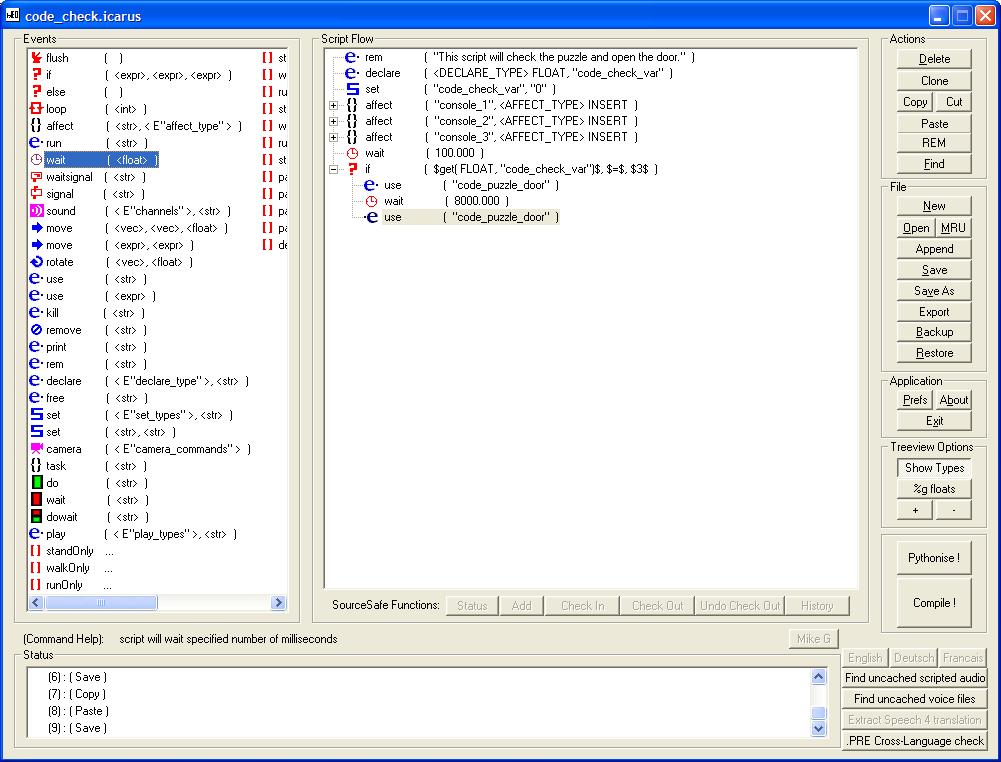
Save and compile this script.
If you have any trouble, here's the one that I made. You can use it, just be sure to change the console buttons' IF statements to match your code.
One script left to make, then you can test this. If you haven't made your animMap shader yet, don't worry, I'll post a link to one you can use.
Making the Button Scripts
These scripts will be pretty straightforward. All three of the buttons will be very similar. In fact, only one block will be different between them.